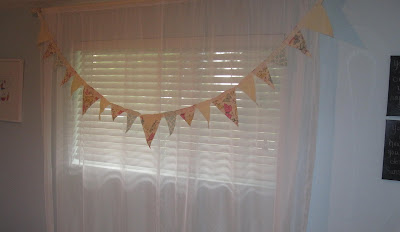
I've been working on a few little projects to add some personal crafty touches for her space. The most recent project is this sweet fabric banner/pennant to hang across her window. I have seen one in the pottery barn catalog for ages now and always wanted to give it a shot...so here it is.


So, the process was pretty simple and priced right!
I chose 3 different fabrics that I liked and that coordinated well together with the colors. The biggest factor for me was the colors. I honestly have not pinned down a solid decor plan for McKenna's room, I just know that I like the vintage-ish color scheme with that pop of blue.
I found the Butterfly fabric in the clearance bin at JoAnn's. 1/4 yard cost me .90! Score!
The blue and white patterned fabric was actually a upholstery sample that was on clearance. It was a 20"x20" square for $1. I could only get a few triangles out of that so I just spaced them out right when laying out the triangles. It was the right color and the right patter to coordinate with the butterfly print so I couldn't pass it up.
The yellow/white seersucker was regular price at 9.99/yard, but I had a 50% off coupon and only bought a 1/4 yard so it was $1.25. The ribbon I used was a roll from Walmart that I had in my stash, but the price tag on it was $2 and I still have tons left over.
So, all in all this pretty little banner that adds color and pattern to her big window cost me less than $5! She loves it and so do I!!
You might be thinking "if you want color and pattern, why not add panels to the window?" right? I wanted to, trust me! Her room is very small and this window is pretty big. I want her room to keep a very light and airy feel so I went with sheers and then decided to add the banner to add color and interest. It works =)
So, just in case you want to throw your hat in and create this sweet banner for something in your life here is how I did it. So simple! =)

What you need:
1) Fabric of your choice...however many patterns and colors you want. I purchased 1/4 yard of each. I love to mix patterns, but always make sure the colors in each patter tie together. I have see some banners that are all completely different in colors and patterns and still look so fun! 2) 1"-2" ribbon 3) Sewing machine or new sew tape that you can iron on...sewing machine is not completely necessary, but I liked the finished look with the stitching. 4) Cotton backing fabric, white, cream or ivory just so it has a finished look on the back and also keeps the pattern strong without letting light through the back. I hope that makes sense. 5) pattern for the triangles {I added the link for the pattern I used below}
First download, print and cut out your pattern.
you can find the pattern I used right here at sew4home . Very inspirational blog. I googled "patterns for a pennant banner" and that is how I found her. I loved how the triangles were all different sizes. Although you don't have to do it that way.
Line up your patters on your fabric and start cutting them out. The pattern shows a fold line, but I didn't use the fold. I just cut single layers of each triangle and sewed the solid backing on later

I made sure to line up the different sizes in the way that l like most. This is part is all preference. you might want to use all the same size. I just mixed it up. So finish cutting your first fabric and move on to the next. Until you have all the triangles you want. I just cut and put them in order when everything was finished being cut. I had triangles left over.


After all my triangles were cut out (including the backing fabric) I laid them out in the pattern I wanted to them sewn and got to work on my sewing maching.


It's not 100% necessary to sew the backing on each triangle. I chose to do it becaue the seersucker and the butterfly fabric are thin and since it would be hanging over a window I did not want the light to dillute the patterns. The backing just helps with that. So, if you are not hanging it in front of a window, then you can probably get away with skipping that step. It's a big step as far as time goes, but I was happy with the finished product =)
Lastly, once the triangles are all ready to go stack them in the order you want and start sewing your ribbon on.

And Wha La!! A sweet, pretty, girly banner for McKenna's room! Here is a little lesson to learn from my mistake. I did not measure the window! haha...wow, right? I thought I could just guess at it. Turns out I over estimated the amount of traingles I needed. I might shorten this up one day...or just get use to this length. Either way I love it!
{sorry for the terrible picture!}


So cute! Little girls rooms are the cutest =) I wish I knew how to sew! You did such a great job on that banner...ADORABLE!
ReplyDelete