Saturday, April 30, 2011

Ruffle wreath...

Yet another sweet little project from Emily at JonesDesignCompany.

On Friday morning I woke up at 4 am, couldn't sleep and thought to myself..."self, you need a wreath on the front door..." 30 minutes later, I had this sweet little thing showing off to the people driving and jogging by our house. Seriously, 30 minutes, so it was on my door around 5:00 am...haha...I need help!

I loved this tutorial from Emily and decided to throw one together. So quick and easy and versatile. I will probably move this into the kitchen when and if it ever gets done.


If you want to make one too you can find the tutorial here
I will post a tutorial for the cute little white flowers later. I just wanted to get this up before going to bed for the night =) I don't want to be up at 4am again...or do I?

Have a great Sunday everyone! If you life in WA, it's going to be amazing weather! Yesss!

Kitchen Remodel...re-do

So, as you all know our kitchen remodel has been long and drawn out. This is for a few reasons, but it really all comes down to my procrastination (and Brian's) and also the fact that I get side tracked soooo easily! I have this issue where if something is working, even if it's not the most convenient, I can live with it... Like the kitchen. *rolling eyes at myself*
I mean our kitchen is definitely working and we cook in it every day, but our dishes are still in the laundry room

our silverware tray is still in the pantry


and we still have NOTHING in our door-less, drawer-less cabinets (at least I finished the pantry people)


What the heck is wrong with us...Just get the kitchen done Hecks!!! I'm screaming it! =)
So, our amazing friend Steve has mad skillz in the painting department and also owns a paint sprayer =) He came over a while back and sprayed down out cabinet doors and drawers! Amazing! Saved us so much time! Thanks Steve!

Now, keep in mind I sanded the heck out of these doors and used TSP after sanding to make sure to remove any leftover residue or oil...these cabinets are 30+ years old after all. So, I thought I did everything I could...turns out it wasn't enough. The oils or stain from the old oak cabinets is lifting through the 2 coats of primer and 3 coats of paint. Kind of pale yellow-ish, grainy looking spots.
{Can you see the yellowish color?}
Not noticeable from a distance, but when you get up on it you see it. I think our mistake was not using oil based primer =( We tried to save time...turns out it only created more work in the end.
There is a positive here though. Since the stain/residue is starting to lift and I don't want to go back and sand all the cabinets back down again I decided to go back to the design drawing board...fun stuff.

The new plan you might ask?
Well, we are going with color for the lower cabinets! Soooo freakin excited! We decided on gray; Brian's idea actually...Brilliant man he is because I love the idea of gray! I can say all that because he rarely reads my blog and that comment won't go to his head. We haven't nailed down the exact shade yet, but we know for sure that that it will be gray lower cabinets and white open shelving.

Here are a few inspiration photos for the new Kitchen remodel...remodel =)
I will take this kitchen!! So beautiful! Brian likes the darker shade of gray like this one below. I'm not sold on that dark...it is a very small galley kitchen after all...


How much do you love the glass on the sides of these cabinets! Yummm!

This one is my favorite. Found this picture ontheletteredcotta ge. I love everything about this kitchen! Seriously! EVERYTHING! I am leaning more towards the lighter shades of gray like this. I don't want the darker gray lower color to close in the small galley

I realize this is just the opposite...gray uppers, white lowers, but gorgeous anyways!
We are still sticking with our original inspiration for the bead board walls and open shelves shown here from Jonesdesign blog. It's not secret that I love this gal and her made style skills! Loooove her!
So, my faithful followers...there you have it! That is the update {as lame as it is} on the Heck kitchen remodel...re-do =) Oh well...we keep learning as we go. I'm over it...I JUST WANT IT FINISHED!!! =)

Wednesday, April 27, 2011

McKenna's room...

So, I am in the slow process of Making McKenna's room a little more grown up...sniff, sniff. I'm going to sound like a little ole' Grandma right now, but seriously...WHERE DOES THE TIME GO????

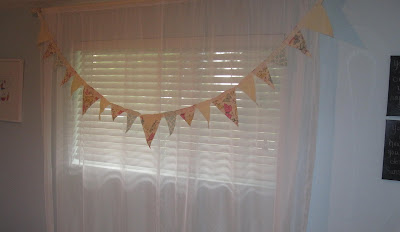
I've been working on a few little projects to add some personal crafty touches for her space. The most recent project is this sweet fabric banner/pennant to hang across her window. I have seen one in the pottery barn catalog for ages now and always wanted to give it a shot...so here it is.


{I'm not ready to show a full room shot as I still have some organizing and purging to do before her room is Blog photo ready =) , but I can share a few little shots here and there =)} These pictures were taken with my canon point and shoot so they aren't the best, but I hope you get the idea =)


So, the process was pretty simple and priced right!

I chose 3 different fabrics that I liked and that coordinated well together with the colors. The biggest factor for me was the colors. I honestly have not pinned down a solid decor plan for McKenna's room, I just know that I like the vintage-ish color scheme with that pop of blue.

I found the Butterfly fabric in the clearance bin at JoAnn's. 1/4 yard cost me .90! Score!


The blue and white patterned fabric was actually a upholstery sample that was on clearance. It was a 20"x20" square for $1. I could only get a few triangles out of that so I just spaced them out right when laying out the triangles. It was the right color and the right patter to coordinate with the butterfly print so I couldn't pass it up.


The yellow/white seersucker was regular price at 9.99/yard, but I had a 50% off coupon and only bought a 1/4 yard so it was $1.25. The ribbon I used was a roll from Walmart that I had in my stash, but the price tag on it was $2 and I still have tons left over.


So, all in all this pretty little banner that adds color and pattern to her big window cost me less than $5! She loves it and so do I!!


You might be thinking "if you want color and pattern, why not add panels to the window?" right? I wanted to, trust me! Her room is very small and this window is pretty big. I want her room to keep a very light and airy feel so I went with sheers and then decided to add the banner to add color and interest. It works =)


So, just in case you want to throw your hat in and create this sweet banner for something in your life here is how I did it. So simple! =)


What you need:

1) Fabric of your choice...however many patterns and colors you want. I purchased 1/4 yard of each. I love to mix patterns, but always make sure the colors in each patter tie together. I have see some banners that are all completely different in colors and patterns and still look so fun! 2) 1"-2" ribbon 3) Sewing machine or new sew tape that you can iron on...sewing machine is not completely necessary, but I liked the finished look with the stitching. 4) Cotton backing fabric, white, cream or ivory just so it has a finished look on the back and also keeps the pattern strong without letting light through the back. I hope that makes sense. 5) pattern for the triangles {I added the link for the pattern I used below}

First download, print and cut out your pattern.

you can find the pattern I used right here at
sew4home . Very inspirational blog. I googled "patterns for a pennant banner" and that is how I found her. I loved how the triangles were all different sizes. Although you don't have to do it that way.


Line up your patters on your fabric and start cutting them out. The pattern shows a fold line, but I didn't use the fold. I just cut single layers of each triangle and sewed the solid backing on later


I made sure to line up the different sizes in the way that l like most. This is part is all preference. you might want to use all the same size. I just mixed it up. So finish cutting your first fabric and move on to the next. Until you have all the triangles you want. I just cut and put them in order when everything was finished being cut. I had triangles left over.


After all my triangles were cut out (including the backing fabric) I laid them out in the pattern I wanted to them sewn and got to work on my sewing maching.


{I left the edges raw, I like the way that looks}


It's not 100% necessary to sew the backing on each triangle. I chose to do it becaue the seersucker and the butterfly fabric are thin and since it would be hanging over a window I did not want the light to dillute the patterns. The backing just helps with that. So, if you are not hanging it in front of a window, then you can probably get away with skipping that step. It's a big step as far as time goes, but I was happy with the finished product =)


Lastly, once the triangles are all ready to go stack them in the order you want and start sewing your ribbon on.


And Wha La!! A sweet, pretty, girly banner for McKenna's room! Here is a little lesson to learn from my mistake. I did not measure the window! haha...wow, right? I thought I could just guess at it. Turns out I over estimated the amount of traingles I needed. I might shorten this up one day...or just get use to this length. Either way I love it!
{sorry for the terrible picture!}


Tuesday, April 26, 2011

Easter Weekend

It's taken me a few days to find the time to sit down and share our Easter pictures with you. Hope you all had a great Easter weekend with your families and/or friends. We were so busy, but it was a great weekend. A memorable one for sure.

When thinking about McKenna's Easter basket, I wanted to keep it simple, but meaningful to her at her sweet little 3 years of age. Of course I wanted to make something special for her basket! So, when browsing through some of my fave bloggers I came across this link on Emily Jones blog. I fell in love immediately and had to try it! Thanks Martha Stewart.


I attempted a project never attempted by me before. I made these sweet little "fellas" {that is what McKenna called them}


Total cost for these sweet little bunnies was about $2 each. McKenna loves hers and so does her little BFF, Kennedy {my friend Mel's little girl}.


McKenna even took her sweet little bunny {she named "him" Hop} to church with us that morning


Watching her new movie "Tangled" that the Easter bunny brought that morning.


My sister and her family. Sweet baby Ben's first Easter. He looks thrilled, doesn't he?


Uncle Erich was teaching McKenna how to do a little reconnaissance before the egg hunt began. She was up against her cousin Chase who is a seasoned egg hunter {Chase is 5}


First there was a wardrobe change before the egg hunt. My birth mom's sister, Bunny, bought Mckenna this special Fairy egg hunting outfit...adorable!


Ben was completely smitten by McKenna's new outfit! He couldn't stop staring at her! It was so cute!


Let the Egg Hunting {#3} begin


Turns out the reconnaissance worked out for McKenna.


Needless to say, our Easter was amazing on so many levels this year. Baskets from the Easter Bunny, church, spending time with friends and family... couldn't ask for more!


Hope your Easter was equally as awesome.


Wednesday, April 20, 2011

Modge podge and Sheet music

I love me some simple and inexpensive wall art! And I also love MODGE PODGE for the record!!!

I have made a few of these wrapped canvases in the past couple months and always completely dig how they turned out. You can personalize these beauties for anyone or anything!

I used the the lyrics from the sweet, old song "you are my sunshine" because here in Washington it's very fitting...especially this part of the song.

What I love most about this project; it's simple and quick! You know how I love instant satisfaction in my craft room. =)

For the words I used two sets {fonts} of foam scrapbooking letter stamps and paint that I already had in my stash. I love how it turned out. This will be part of a gallery wall in the master bedroom. I can't wait till that is done
!

This one I made for McKenna's room. I used some of the same sheet music from the canvas above and then a few sheets of true vintage sheet music that was given to me from a gal at a little shop in downtown Sumner.

For the glitter crown in the center, I used some thick scrapbooking paper I had left over from my scrap stash and cut out the crown on the Cricut. Sprayed it with paper adhesive, glittered the heck out of it with Martha Stewart glitter than sprayed the adhesive over the glitter to keep it from "glittering" all over the floor.

My husband hates glitter! What husband of a crafter doesn't?? He actually calls it the Herpes of the craft world...once you get it on you it never goes away...I know, probably not funny to everyone, but if you are reading my blog you probably think it's funny...just a little. =)

So, if you are thinking that maybe you would like to try this fun project, here is what you need.


  • Artist canvas in whatever size your little heart desires {I picked up my canvas at Michaels with a 50% off coupon. I got two 12x12 in a pack for around $4 after the coupon}

  • An old book you are willing to tear up for the love of crafting or old sheet music {or both}

  • modge podge {I also bought this at Michaels with a 50% off coupon}

  • A shape {or pictures or a monogram work great too} that you want on your
    canvas

  • Glitter if you want to glitter it or letter stamps...get creative...you can pretty much modge podge anything on here...well, almost anything...

  • small paint brush {I used a 2" brush that I had on hand already}


start rippin up those pages into whatever order you want them on your canvas.

Once you have all your pages where you want them start gluing them down with your MP and paint brush. If you have never used Modge Podge before a couple things to know.


  • it is water based glue and sealer so you will use it to glue down your pages and also another coat over the top to seal it and give it that glossy finished look.


  • since it is water based glue and sealer your pages will bubble up, don't worry, when it dries the paper shrinks back down and dries flat.

After you have modge podged over the top and have the edges all pressed down and around the back side. Go ahead and embellish the canvas however you want. Or leave it blank...I mean, it is pretty cool with just the sheet music or book pages.

Up close you can see how I wrapped the edges around and then glued them down to the sides and the back.

So simple and so pretty. Love this project!